LUSIFER MODCHIP
FORUM
ASK ANYTHING U LIKE!


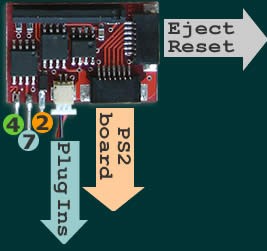
>> installation
|
LUSIFER MODCHIP |
|
|
|
|
|
|
>> installation |
|||||
| _ Lusifer modchip | ||
| _ Installation | ||
| _ Swap tricks | ||
| _ PS2 models | ||
| _ PS2 repair | ||
| _ Spare Parts_ | ||
| _ Mods research | ||
| -- Mods comparison | ||
| --> order info | ||
| _ L-mod price list | ||
| _ shipment | ||
| _ shoping cart | ||
| --> company info | ||
| _ about us | ||
| _ conatct us | ||
| --> mailing list | ||
|
- name :
|
||
| --> mods pictures | ||
| -- Lusifer Research | ||
| -- GRmods factory | ||
| -- Available stock | ||
| -- Lusifer 2nd Edition | ||
|
|
||
|
designed by @.t.n.s |
||
|
|
||
|
||||||||||||||||||||||||||||||||||||||||||||||||||||||||||||||||
|
|
||||||||||||||||||||||||||||||||||||||||||||||||||||||||||||||||
|
1. Insert your model (SCPH-xxxxx) |
|||||||||||||||||||||||||||||||||||||||||||||||||||||||||||||||