 |
Lusifer mod: No PS2 can
RESIST! |
 |
|
 |
 |
 |
 |
 |
 |
|
/ home / Installation help / SCPH-3xxxx / V3 consoles |
| Installation of Lusifer modchip in V3 consoles - No Configuration! | |||
|
|
The installation of Lusifer mod in V3 consoles, require to open the console
and lose the guarrantee. |
||
 |
The installation will be performed, by a 12 tears old boy, who has modify
his PS2 by himself! |
||
|
Lusifer mod: Installation Guide in V3 consoles - by SluR (12 years old) |
|||
 |
Remove the elastic covers, |
||
 |
Pull the upper protective case of PS2, |
||
 |
Place the upper protective cap, |
||
 |
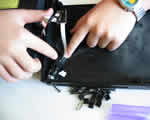
Unscrew the 2 gold-coloured screws, |
||
 |
Lift the CD-Rom, as shown in the photo. |
||
 |
Install G1-Plug In, |
||
 |
Connect the long edge of G1-Plug In to Lusifer mod. |
||
 |
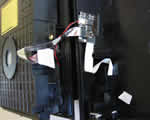
Disconnect the original Ribbon Cable from the Eject/Reset button. |
||
 |
Connect the original Ribbon Cable to Lusifer mod connector shown in the photo. |
||
 |
Use the extra Ribbon Cable that comes with Lusifer mod, |
||
 |
Connect the other side of the extra Ribbon Cable to the Eject/Reset button. |
||
 |
Put back the Eject/Reset button. |
||
 |
Place Lusifer mod in the upper protective cap of PS2, |
||
 |
Reassemble your PS2, |
||
|
Lusifer full: Diagrams for V3 consoles - 3 points to solder! |
|||
|
|||

